


Introduction
Next.js is a powerful React framework for full-stack web applications. It simplifies development by handling setup tasks, letting developers focus on building features.
Key features include:
Routing: Next.js offers an easy-to-use file-system-based router with advanced features like layouts, nested routing, loading states, and error handling.
Rendering: Supports both client-side and server-side rendering with optimizations for faster loading times and improved performance.
Data Fetching: Simplified data fetching with async/await in Server Components and an extended fetch API for request memoization, data caching, and revalidation.
Styling: Supports various styling methods such as CSS Modules, Tailwind CSS, and CSS-in-JS, providing flexibility for developers.
Optimizations: Out-of-the-box optimizations for images, fonts, and scripts to enhance Core Web Vitals and user experience.
TypeScript: Improved support for TypeScript with better type checking, efficient compilation, and custom TypeScript plugins and type checkers.
In this guide, we'll explore Next.js routing with the App Router, simplifying navigation and enhancing user experience in web apps. Covering basic, nested, dynamic routing, and advanced features for efficient route management.
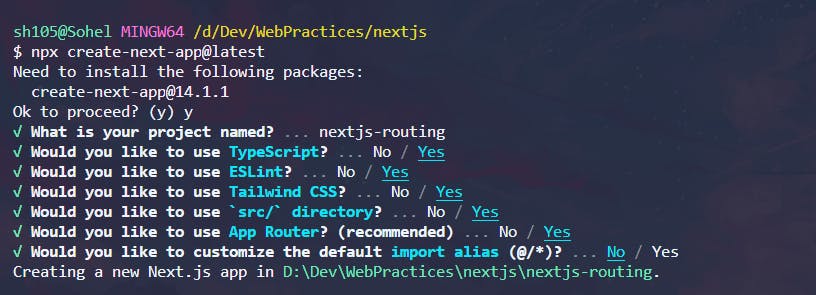
Create first Next.js App
npx create-next-app@latest
The create-next-app command will prompt you to configure your project. You can choose whether to use TypeScript, ESLint, or Tailwind CSS. Follow the prompts and select the options that suit your project requirements.
Routing
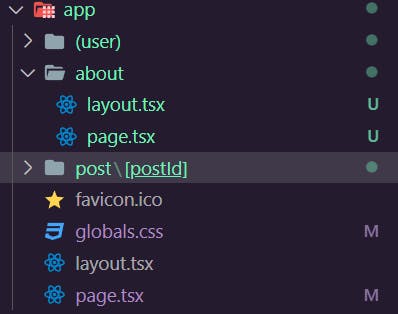
Next.js uses a file-system based router where folders are used to define routes.
Each folder represents a route segment that maps to a URL segment. To create a nested route, you can nest folders inside each other.
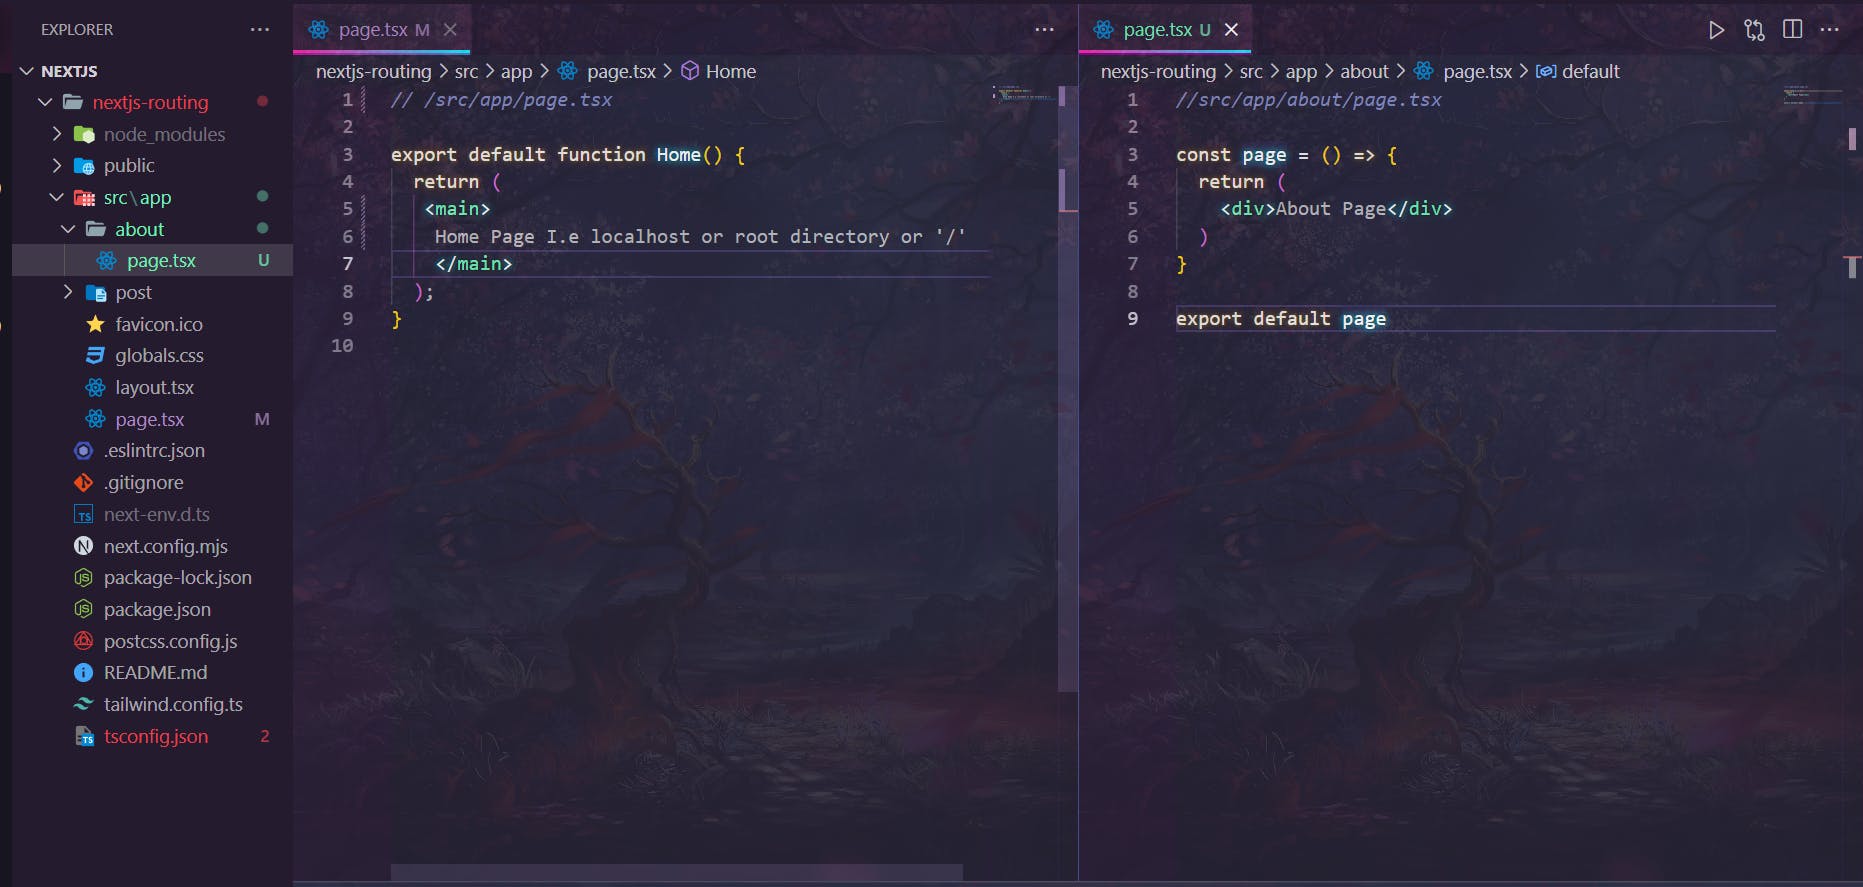
As depicted in the image, each folder corresponds to a specific route, and within each folder resides a page.tsx file serving as the entry point for that particular segment or route.
The
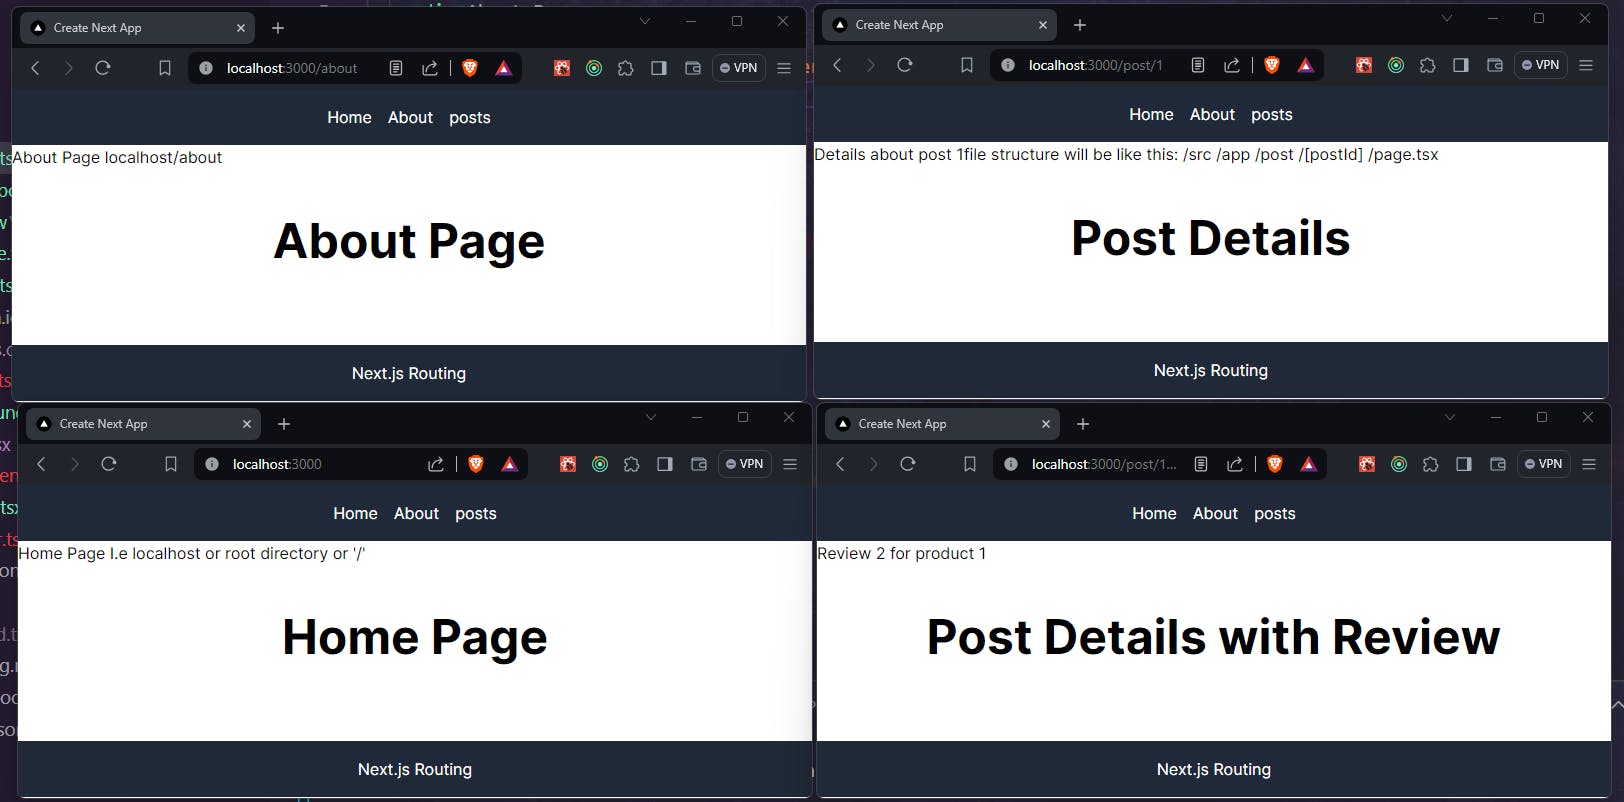
src/app/page.tsxfile corresponds to the routelocalhost/300src/app/about/page.tsxfile represents the routelocalhost/300/about

We can also Create Nested Route inside the one route
//src/app/post/page.tsx

export default function Post() {
    return <h1>Post Page</h1>
}

//src/app/post/first/page.tsx

export default function firstPost() {
    return <h1>First Post Page</h1>
}
But this method isn't recommended for complex applications.
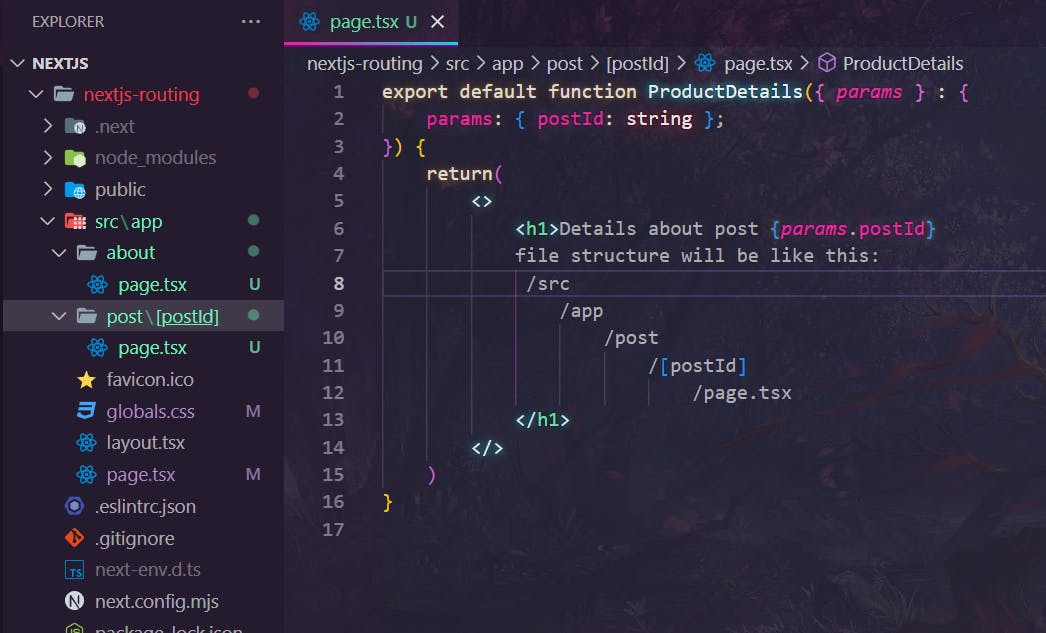
Dynamic Routing
It refers to the capability of generating pages dynamically based on the parameters provided in the URL. Instead of creating separate static pages for each possible route, you can use dynamic routing to handle patterns or parameters in the URL, making your application more flexible and scalable
export default function PostDetails({ params } : {
    params: { postId: string };
}) {
    return(
        <>
            <h1>Details about post {params.postId}</h1>
        </>
    )
}

Nested Dynamic Routing
Nested dynamic routing in Next.js refers to the process of combining nested routes with dynamic routing to create a more complex and flexible routing structure. This approach allows for the dynamic generation of pages based on both nested folder structures and URL parameters. By nesting dynamic routes within each other, developers can build intricate routing patterns to suit various application needs.
export default function PostDetail({
    params,
  }: {
    params: {
      postId: string;
      reviewId: string;
    };
  }) {
    return (
      <>
        <h1>
          Review {params.reviewId} for product {params.postId}
          folder structure will be like this:
          /src
          --/app
            ----/post
                ----/[postId]
                    ----/review
                        ----/[reviewId]
                            ----/page.tsx
        </h1>
      </>
    );
  }

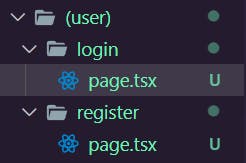
Route Groups
In the app directory, nested folders are normally mapped to URL paths. However, you can mark a folder as a Route Group to prevent the folder from being included in the route's URL path.
This allows you to organize your route segments and project files into logical groups without affecting the URL path structure.

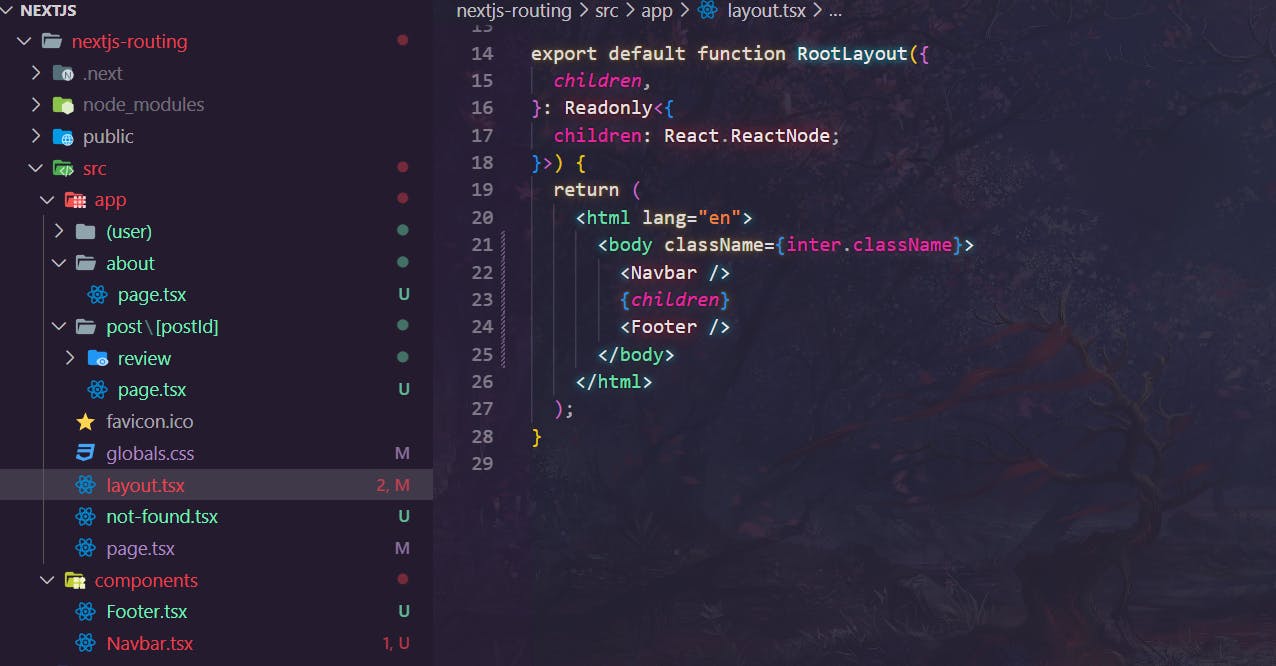
Layouts
A layout is UI that is shared between multiple routes. On navigation, layouts preserve state, remain interactive, and do not re-render. Layouts can also be nested.
You can define a layout by default exporting a React component from a layout.tsx file. The component should accept a children prop that will be populated with a child layout (if it exists) or a page during rendering.
For example, the app level layout will be shared across all the routes
/about layout will only share in about routes pages in the same manner we can have nested layout as well
In our example, we have a navbar and footer that need to appear across all routes in our application, ensuring consistent branding and navigation. To achieve this, we include the navbar and footer components within the layout structure of the app, guaranteeing their presence on every page and maintaining a cohesive user experience across all routes.
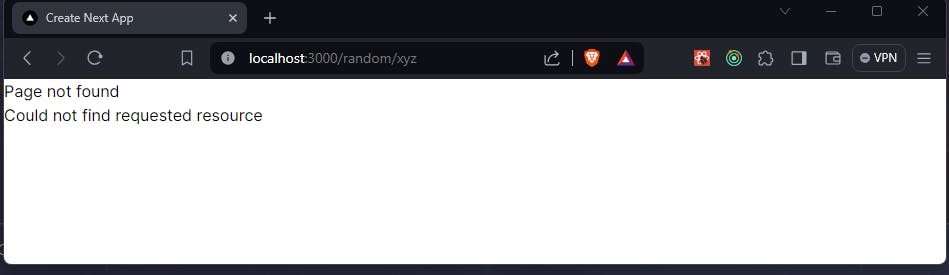
404 page
The not-found file is used to render UI when the notFoundfunction is thrown within a route segment. Along with serving a custom UI, Next.js will return a 200 HTTP status code for streamed responses, and 404 for non-streamed responses.
//src/app/not-found.tsx

export default function NotFound() {
    return(
        <>
            <h2>Page not found</h2>
            <p>Could not find requested resource</p>
        </>
    )
}
Parallel Routes
Parallel Routes allows you to simultaneously or conditionally render one or more pages within the same layout. They are useful for highly dynamic sections of an app, such as dashboards and feeds on social sites.
Parallel routes in Next.js are defined using a feature known as slots. Slots help structure our content in a modular fashion.
To define a slot, we use the ‘@folder’ naming convention. Each slot is then passed as a prop to its corresponding layout.tsx file.
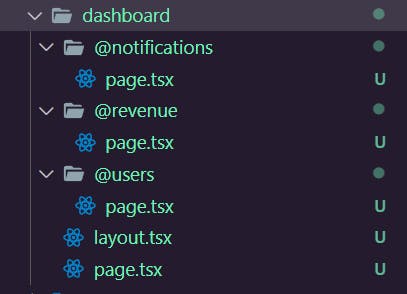
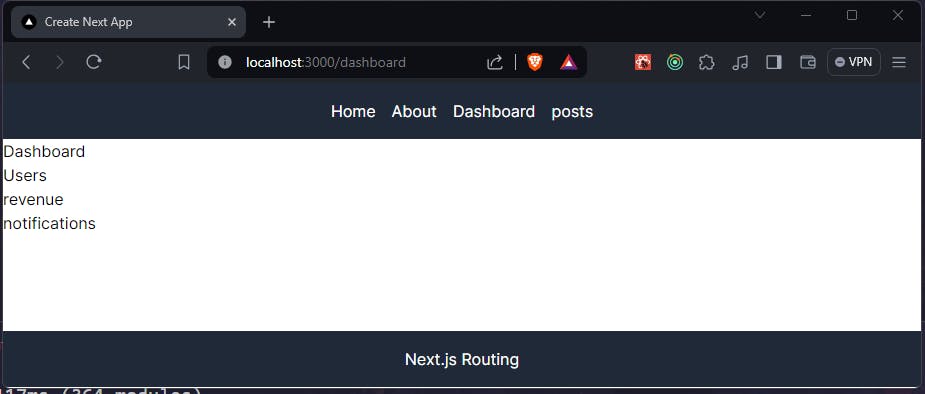
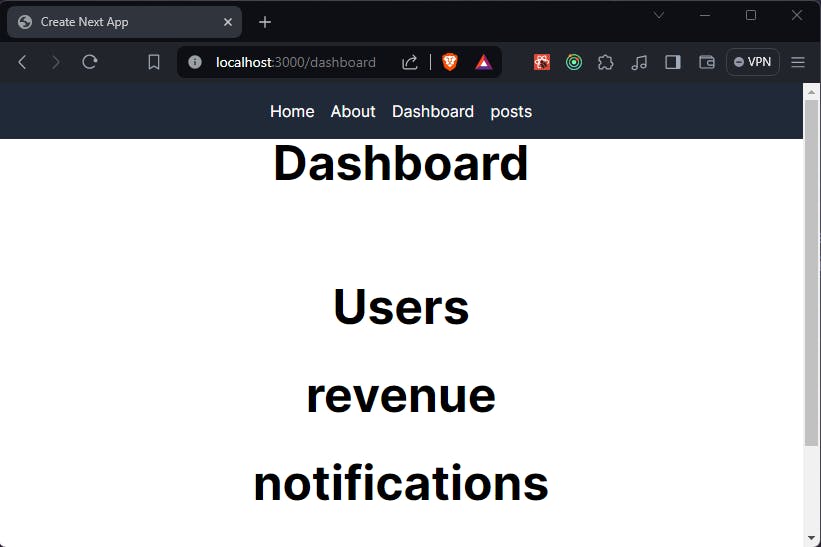
In this example, let's say we have a /dashboard page with three sections: users, revenue, and notifications. Next.js enables us to create parallel routes without changing the URL. This means we can display three different components, each with its own error handling, loading states, and UI rendering in the same layout or page
// src/app/dashboard/layout.tsx

export default function DashboardLayout({
    children,
    users,
    revenue,
    notifications }:
{
    children: React.ReactNode;
    users: React.ReactNode;
    revenue: React.ReactNode;
    notifications: React.ReactNode;
}) {
    return (<>
      <div>{children}</div>
      <div>{users}</div>
      <div>{revenue}</div>
      <div>{notifications}</div>
    </>);
}
// src/app/dashboard/@notifications/page.tsx

const notifications = () => {
  return (
    <div className='mb-24'>notifications</div>
  )
}

export default notifications
// src/app/dashboard/@revenue/page.tsx

const revenue = () => {
  return (
    <div>revenue</div>
  )
}

export default revenue
// src/app/dashboard/@users/page.tsx

const Users = () => {
  return (
    <div>Users</div>
  )
}

export default Users
A benefit of parallel routes is their ability to split a single layout into various slots, making the code more manageable
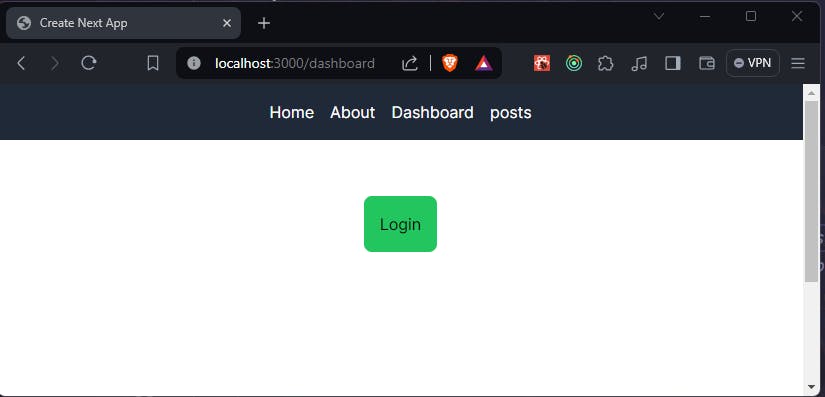
We can achieve even greater flexibility by conditionally rendering components in parallel routes. For instance, we can render the dashboard only if the user is logged in else we redirecting them to the login page if necessary. Similarly, if the user is logged in, we can selectively render only those components for which they are authorized.
For example, we may not want to render the revenue component for a logged-in user; it should be visible only to admin users.
// src/app/dashboard/layout.tsx

import Link from "../../../node_modules/next/link";

export default function DashboardLayout({
  children,
  users,
  revenue,
  notifications,
}: {
  children: React.ReactNode;
  users: React.ReactNode;
  revenue: React.ReactNode;
  notifications: React.ReactNode;
}) {
  const isLoggedIn = true; // getting from database or session
  const role = 'user'; // getting from database or session

  return (
    <>
      {isLoggedIn ? (
        <>
          <div>{children}</div>
          <div>{users}</div>
          {role === 'admin' && <div>{revenue}</div>}
          <div>{notifications}</div>
        </>
      ) : (
        <div>
          <Link href={`/login`}>Login</Link>
        </div>
      )}
    </>
  );
}
// not logged in so we redirect user to log in page by a link
// or we can either render login compoenent directly here also
const isLoggedIn = false; // getting from database or session
const role = 'user'; // getting from database or session
 const isLoggedIn = true; // getting from database or session

// user should not see revenue
 const role = 'user'; // getting from database or session
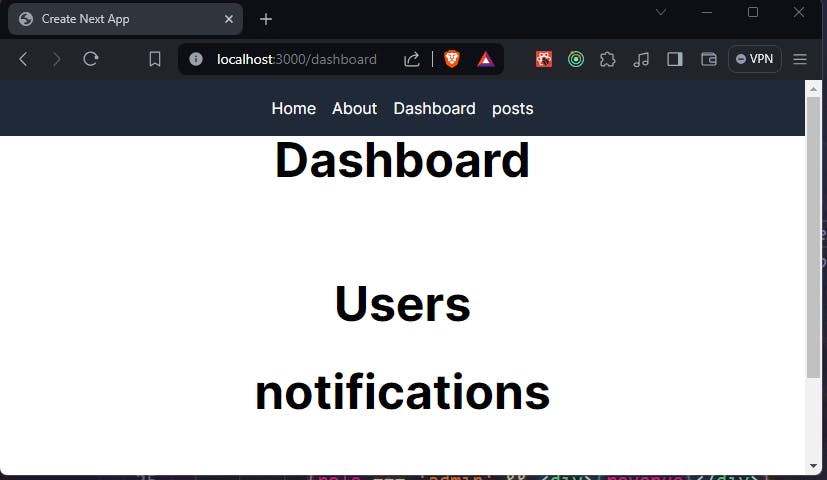
 const isLoggedIn = true; // getting from database or session
// admin has access to revenue
 const role = 'admin'; // getting from database or session
Link and Router
In Next.js, the <Link> tag is imported from next/link, enabling users to navigate to different page URLs without refreshing the page, effectively creating a single-page application.
The useRouter hook facilitates programmatically changing routes within Client Components.
'use client'

import { useRouter } from 'next/navigation'

export default function Page() {
  const router = useRouter()

  return (
    <button type="button" onClick={() => router.push('/dashboard')}>
      Dashboard
    </button>
  )
// we redirect user to directly dashboard page
//  src/components/navbar.tsx
import Link from "next/link";

export default function Navbar() {
  return (
    <nav className="bg-gray-800 py-4">
      <ul className="flex justify-center space-x-4">
        <li>
          <Link href="/" className="text-white hover:text-gray-300">
            Home
          </Link>
        </li>
        <li>
          <Link href="/about" className="text-white hover:text-gray-300">
            About
          </Link>
        </li>
        <li>
          <Link href="/dashboard" className="text-white hover:text-gray-300">
            Dashboard
          </Link>
        </li>
        <li>
          <Link href="/post" className="text-white hover:text-gray-300">
            posts
          </Link>
        </li>
      </ul>
    </nav>
  );
}
Important Points
In Next.js, the
page.tsxfile is mandatory for a page or route to be accessible to the public .The folder name inside the
appdirectory determines the route from localhost. For example, if we create a folder nameddashboardinsideapp, the URL for the dashboard will be http://localhost:3000/dashboard, and it should contain itspage.tsxfor accessing the route.The
default.tsxfile is used to render a fallback within Parallel Routes when Next.js cannot recover a slot's active state after a full-page load.
Conclusion
In this guide, we explored Next.js routing, covering basic to advanced techniques like nested, dynamic, and parallel routing. We learned how to create our first Next.js app, organize routes, handle dynamic content, and maintain consistent layouts. Next.js offers powerful routing capabilities, enabling developers to build modern, scalable web applications efficiently.
...to be continued & follow for more